Wednesday, May 16, 2012

Teeny, Tiny Bites of Heaven ~ Mini Brownie Bites!

I was kindly asked to make some goodies for a dear, dear friend's going away party ~ something that is always the biggest compliment!  Knowing that I am always willing to get my baking fix, I gladly obliged.  This could turn out to be quite a large shindig so I knew I would want to make something that could feed many mouths.  I am in love with tasting parties, finger foods and mini desserts, so knew immediately I wanted to make some mini brownies and top them with yummy things!

My imagination ran wild and I had to quickly reign it in.  I made myself decide on 3 flavors.  The winners were Peanut Butter Cup, Chocolate Marshmallow and Strawberry Cheesecake. 

I can make a mean homemade peanut butter frosting, if I do say so myself, but so can you.  It is the simplest recipe but will cause your friends to beg for the recipe.  So here it is!


Homemade Peanut Butter Frosting

1/2 cup creamy peanut butter
1 tsp vanilla
1/4 cup butter
2 cups powdered sugar
1/4 cup milk

Simply combine all ingredients and beat until smooth!  ** I found mine to be a little runny and I was out of powdered sugar at this point, so I simply placed it in the fridge for about 20 minutes and it thickened up.

I piped the frosting on top of mini brownies that I made in here from a simple Betty Crocker boxed brownie mix (bake at 350 for 12 minutes and pop out of pan 1 minute after removing from oven!)I then topped them off with a mini-buckeye each that I found at a little sweet shop a little bit ago.


For the Strawberry Cheesecake brownie bites I did the same thing in terms of the mini brownies, but then whipped up the frosting on my own again.  Deeeelish! 

Homemade Strawberry Cheesecake Frosting

1/2 cup strawberries (pureed in food processor)
1/4 cup butter (room temp)
3-4 cups powdered sugar
8 oz cream cheese (room temp)

1.  Cream the butter and cream cheese
2.  Mix in the strawberries.
3.  Add the powdered surgar to taste / consistency preference.

Just as with the Peanut Butter frosting, this was a tad soupy so I chilled it for a few minutes and then it was good to go!  I topped them with a single white chocolate chip and they were complete.


Lastly, I did Chocolate Marshmallow.  Thankfully Riley had begged for some pastel mini marshmallows at the store recently as though she would just die if we didn't buy them ... and then never ate a single one ... so I had cute garnish right in my pantry.  I knew it was love at first sight recently when I saw the Frosting Creations by Duncan Hines at Target.  Have you heard of these?  They are tubs of plain white frosting but then about ten different flavoring packets you can pick from that you mix into the plain frosting.  Brilliant!  When I saw Chocolate Marshmallow, I knew I had to try!  I quickly mixed the packet and the frosting together, piped it onto the mini brownie, and then topped it with a mini marshmallow.  How simple is that?!


The final product?  A beautiful display of teeny, tiny bites of heaven ready to serve up!


Wednesday, May 9, 2012

"Ice Cream" Grilled Cheese Sandwiches!

The more fun the food, the better chances I have of my daughters finishing every last bite.  This was the case earlier this week when I made "Ice Cream" Grilled Cheese Sandwiches for them.  I cannot claim this brilliant idea as my own; it is something I found on Pinterest over the weekend.  I knew immediately that I needed to make it.


Ingredients (per sandwich):
1 banana
2 buttered slices bread
1 slice of cheese
1 quarter of strawberry

Directions:
  1. Cut off the crust of each piece of bread.  Do this carefully, as you will be using the crust to make the ice cream cone detail.
  2. Create the grilled cheese sandwich as you normally would.  (Place a slice of cheese between two buttered pieces of bread and place in skillet or griddle over medium heat.  Grill until golden brown).
  3. Cut the grilled cheese into a triangle shape, representing the cone.  (Save the extra for when your kiddo(s) would like seconds!)
  4. Place the crust over the bread in a waffle/criss-cross pattern to turn into the ice cream cone.
  5. Slice bananas (I love using this to quickly slice my bananas and in uniform shape in seconds!)
  6. Arrange banana slices on plate above the "cone" and top with the quarter strawberry!
  7. Watch your child's eyes widen in delight at their FUN lunch or dinner!
Enjoy!

Super Fast Veggie Dip

This is a great recipe to keep in mind when you need something quick to set out for unexpected guests.  I've used it many times in that situation but also make it quite a bit for my family and I to munch on veggies with.  I bet you have everything on-hand already:

Ingredients:
1 cup fat free mayo
1 cup fat free sour cream
2-4 Tbsp* of your favorite rub (this is our favorite - gives it a GREAT bite)
     * I say 2-4 because this really is a recipe that you have to add to your preferred taste. 
       Start with 2 Tbsp and increase from there if you prefer.

Directions:
1.  Mix all ingredients together.  Enjoy!


SIMPLE, right?!

Death by Chocolate Trifle ~ YUM


I was doing a Pampered Chef show for a friend a little over a week ago and she had made a Death by Chocolate dessert for her guests.  At one glance (and then at many bites), I knew I had to make my own.  As she described her steps to me, I knew I wanted to make mine into a trifle.  Afterall, I love all things trifle and most love that you really never need a recipe - just throw together lots of different things that sound good together and somehow they always come out looking - and tasting - amazing!

That was the exact outcome here.


I literally left her show and drove directly to Target and picked up some candy, as I had all the other ingredients on hand already.  Here are all of my ingredients:
~ Chocolate cake mix (+ ingredients to prepare as directed)
~ Mini Reeses Cups
~ Kit Kat bars
~ Reeses Pieces
~ Chocolate syrup
~ Large Cool Whip (you'll want it thawed for this recipe)
~ Large box chocolate pudding

Is your mouth watering yet?  Just wait.

I was actually preparing this quickly to take next door in an hour to a friend's party, so I had to be quick.  To make a normal 9x13 cake according to the cake mix directions, I needed to let it bake for 33 minutes.  I didn't have that time.  Instead, I pulled out my trusty Brownie Pans and poured the prepared batter into each well.  I had enough for nearly two full pans.  I baked the cake at 350 for 17 minutes instead and they came out PERFECTLY done.  I saved 16 minutes, cutting the baking time nearly in half!  Since I'd be crumbling the cake anyhow, it didn't make a single difference.

During those 17 minutes I pulled out my Food Chopper and started chopping away at the Kit Kat, breaking it into a fine crumble.  I prepared the pudding as directed and let it sit for the suggested 5 minutes.  After that time I combined it with half of the cool whip, creating a mousse-like concoction.  Then the fun began! 


Once the cakes came out I crumbled them by hand into the bottom of my Trifle Bowl.  My layers went like this:

1.  Crumbled chocolate cake
2.  Cool Whip
3.  Assortment of three candies, sprinkled over Cool Whip
4.  Crumbled chocolate cake
5.  Half of mousse-like concoction
6.  Assortment of three candies, sprinkled over mousse
7.  Crumbled chocolate cake
8.  Second half of mousse-like concoction
9.  Assortment of three candies, sprinkled over Cool Whip
10.  Crumbled chocolate cake
11.  Remaining Cool Whip


(Do you see those little eyes hoping that Mommy forgets to take this with her?)

To finish it all off (as if it needed more), I drizzled chocolate syrup over the top cool whip layer and topped with the remaining assortment of candy!  This dessert was absolutely sinful and you can bet that it was completely gone by the end of the party!  And, better yet, created in 20 minutes or less!  YUMMY!


Monday, April 30, 2012

Triple Layer Brownies: Yes, they are as amazing as they sound

I've mentioned them a few times.  If you're friends with me on Facebook, you've seen them on there a few times.  And if you live near me you've most likely tried them ... a few times.

Triple. Layer. Brownies.  Pretty much the best thing I've ever had.  Your imagination is the limit with this recipe.  I will show you a few of the combinations I've tried with them below and share some that friends have told me they have now tried.  But it all boils down to the same fact: most times it is your three most favorite sweets all baked into one.  I think you're guaranteed to make new friends wherever you take these.

To break it down simply, triple layer brownies have three layers.  The bottom and top layers stay the same - it is the middle layer that you can have a lot of fun with.  Here is a picture of one of the very first ones that I made; the picture demonstrates the three basic steps of the brownie.


The bottom layer is always the break-apart refrigerated cookie dough.  (For local peeps, Target was clearancing the Pilsbury brand over the weekend for $1.88 a package!  Yours truly stocked up, but there may be more left and this may or may not be at other Target stores as well!). 

The middle layer is whatever you prefer, but here I used a full-size Oreo cookie.  More below on other middle layers I have tried as well as others.  The top layer is brownie batter, prepared as directed on the box.  I've used Milk Chocolate, Double Fudge, Mocha ... the Milk Chocolate is my favorite, hands down.  That is all there is to it!  Of course, with the beauty of the Brownie Pan, you don't have to do one pan full of the same middle layers - mix it up!  Do 4 with Oreos, 4 with M&Ms and 4 with Rolos!  Get CRAZY!

Ingredients:
  • 1 package refrigerated break-apart chocolate chip cookie dough
  • Middle layer choice (suggestions listed below)
  • 1 box of brownie mix + ingredients to prepare as directed on box

Directions:

1.  Preheat oven to 350 degrees.  Spray brownie pan wells with a flour-based spray (I prefer Bakers Joy, found alongside Pam and others.  NEVER use Pam - it eats Teflon.  Gross.)

2.  Mix up brownie mix as directed on the box.  Set aside.

3Smoosh 1-1.5 squares of the chocolate chip cookie dough into the bottom of each well

4.  Place middle layer choice on top of the cookie dough.

5.  Pour brownie batter over top of middle layer, filling wells 2/3 full.

6.  Bake for 18-20 minutes.  Allow to cool in the pan for 5 minutes, then invert onto a parchment paper lined cooling rack.  The parchment is very important so that the brownies don't stick to the cooling rack when you invert them. 


A few things to note:
  • Investing in a $1 Citrus Peeler if buying a Brownie Pan is genius.  The tip is perfect size to work down in between the individual wells and their contents, helping release them if necessary.  Plus, it is nylon and won't scratch!
  • This recipe actually makes enough for about 18 brownies, so keep that oven warm or do two pans at once!
  • This one is important:  "Like" my Pampered Chef page on Facebook!  I share recipes, kitchen tips, and will be having a Brownie Pan Creation contest on there soon for a cool prize, so you don't want to miss out!!
Some of the middle layers I have tried?  Oreos, Reeses Peanut Butter Cups, Reeses Pieces, and M&Ms.  I have friends who have also tried York Peppermint Patties, Rolos, Thin Mint cookies and mini Heath Bars.  YUMMO!


Enjoy!

Saturday, April 28, 2012

The Perfect Entertaining Dessert: Mini Pineapple Upside Down Cakes!

Just wait ... If you haven't picked up on the fact that I adore my Brownie Pan, you'll quickly figure it out. 

Last week I gave Mini Pineapple Upside Down Cakes.  Super simple, affordable, fast and DELICIOUS!  These would be the perfect addition to a picnic, office food day, or for a tasting party with friends!

Note:  This recipe is enough for 24 cakes, so two pans worth.  If you own two pans, you can bake them simultaneously at the same time and temp as you would just one.  I highly recommend two! 

Ingredients:
  • 1/2 cup butter
  • 1 cup packed brown sugar
  • 24 marischino cherries
  • 20 oz can pineapple rings in juice
  • 3 eggs
  • Yellow cake mix (18.25 oz size)
  • 1/3 cup oil

Directions:

1.  Preheat oven to 325. 

2.  Drain liquid from pineapple rings into 2-cup Easy Read Measuring Cup.  (I did this by resting my Easy Read Measuring Colander inside the measuring cup.  Pour everything in, lift, and drain!).  Add enough water to the pineapple juice to make 1 1/3 cup liquid.  Set aside.  Cut pineapple rings into quarters.

3.  In Small Batter Bowl, melt butter.  Mix in brown sugar.  Using the Small Scoop, portion a scant scoop of sugar mixture into each well of two brownie pans.  Spread to cover the bottom of wells.


4.  Add two pieces of the quartered pineapple rings to each well.  Place one cherry in the center of each well. 


5.  Combine cake mix, pineapple liquid, eggs and oil in a large mixing bowl.  (My all-time favorite is here).  Whisk until well blended.  Using Large Scoop, portion the batter into wells of Brownie Pan, filling each 2/3 full.


6.  Bake for 20-22 minutes, until cake tester inserted comes out clean.  Cool in pan for 3 minutes, then invert onto parchment-lined cooling rack (the parchment is WELL worth it for any baking, but especially for this recipe.  I highly, highly recommend it).  Serve warm with whipped topping, if preferred!


NOTE:  This recipe can be halved if you have only one brownie pan or only want 12 cakes.  Use a small cake mix (such as Jiffy brand) or measure out 1 2/3 cups of the yellow cake mix and use 2 eggs, 2/3 cup of pineapple liquid, plus 2 Tbsp oil.  Use half of the butter, sugar, pineapple and cherries.

Enjoy!


Mini Cinnamon Sugar Loaves ~ a weekend breakfast treat!

... or an everyday breakfast treat if you ask me.  I don't know too many kids that don't cave for anything coated in cinnamon and sugar.  In fact, I don't know any.  So this was a home run with my girls the other morning.  Very simple, very fast and very yummy in the tummy ... and I bet you have all of the ingredients on hand already ... so get bakin'!  (Of course, this utilizes the all-too-loved Brownie Pan.  My obsession continues.)

Ingredients:
  • 1 3/4 cup flour
  • 1 1/2 tsp baking powder
  • 1/2 tsp salt
  • 1/2 tsp nutmeg
  • 1/2 tsp cinnamon
  • 1/3 cup oil
  • 3/4 cup granulated sugar
  • 1 egg
  • 3/4 cup milk

Topping Ingredients:
  • 1/4 cup butter, melted
  • 1/3 cup granulated sugar
  • 1 Tbsp cinnamon

Directions:

1.  Preheat the oven to 350.
2.  Whisk together the flour, baking powder, salt, nutmeg and cinnamon in a large bowl (my all-time favorite is the Classic Batter Bowl).
3.  In a small bowl, whisk together oil, 3/4 cup sugar, egg and milk.  (Again, I love the Small Batter Bowl).  Add to dry ingredients and stir only to combine; do not over stir.
4.  Use the Large Scoop to divide among Brownie Pan wells.  Bake at 350 for 16 minutes.  Remove from pan to cooling rack immediately.


5.  Combine sugar and cinnamon in a shallow dish.  Dip the tops of each individual loaf into the butter, then into the sugar and cinnamon mixture. 


Store in a covered container or in a sealed Ziploc bag.  Or just eat them all at once.  Enjoy!


Friday, April 27, 2012

Irresistable Mini Apple Pies

Today I tried a Brownie Pan recipe that I have been wanting to try for a few weeks now.  It quickly flew up the ranks to quite possibly my favorite Brownie Pan dessert thus far.  Yup - even outranking the Triple Layer Brownies.  It is ridiculously easy.  And extremely inexpensive.  And amazingly delicious.

Let's cut to the chase.

Ingredients:
  • 1 package Pilsbury Crescent Dough (the flat sheet that they new make ... believe it is Crescent Creations)
  • 1 can apple pie filling
  • 5 Tbsp flour
  • 2 Tbsp sugar
  • 1/2 tsp cinnamon
  • 2 Tbsp butter

Directions:

1.  Preheat oven to 350.

2.  Roll out dough.  I used the Baker's Roller to flatten and stretch it a tad.  I then used the Pizza Cutter to cut it into 12 even squares.  Place one square into each well of the pan. 

 3.  Using the Medium Scoop, place one scoop of apple pie filling onto each square.

4.  In a medium bowl, mix together the flour, sugar and cinnamon.  Cut the butter into this mixture until crumbly.  Using the Small Scoop, place a scant scoop of the mixture to the top of each square.


5.  Pull the corners of the dough to the middle, then add another small scoop of the crumble mixture to the tops.

6.  Bake for 15 minutes; remove from pan to cooling rack immediately.  Serve hot with ice cream or even cold.  Either way, they are to die for!  Enjoy!


Wednesday, April 18, 2012

Microwave Rocky Road Brownie Dessert ... a guaranteed nomination for "Coolest Mom Ever"

Have a chocolate craving and need a quick fix?  You just may have all the necessary ingredients in your home right this minute for this little beauty!  This is the Microwaveable Rocky Road Brownie Dessert.  That's right - microwaveable!  The Deep Covered Baker isn't just for dinner dishes ... it can make some amazing desserts as well!


With some minimal prep, this tasty deliciousness is ready for you to throw into a bowl with a scoop of vanilla ice cream in less than 12 minutes!  I can envision quickly being deemed "Coolest Mom Ever" at a sleepover when making this for a bunch of kiddos!  Enjoy!


Ingredients:

1 cup walnut halves, toasted (can easily be omitted in the event of an allergy!)
¾ cup all-purpose flour
1½ tsp baking powder
¼ tsp salt
¾ cup butter (1½ sticks)
4 oz unsweetened chocolate
1½ cups sugar
3 eggs
16 large marshmallows
20 milk chocolate kisses, unwrapped
Vanilla ice cream (optional)

Directions:
  1. Coarsely chop walnuts.  Place in a prep bowl and set aside.
  2. Combine flour, baking powder and salt in a small batter bowl; set aside. 
  3. Cut butter into pieces and chop unsweetened chocolate; place butter and chocolate into classic batter bowl.  Microwave, uncovered, on HIGH 1-2 minutes or until mostly melted, stirring every 30 seconds.
  4. Add sugar and eggs to chocolate mixture; whisk until smooth using a whisk.  Fold in flour mixture and 1/2 cup of the walnuts until incorporated using a Mix 'N Scraper.
  5. Pour batter into Deep Covered Baker, spreading evenly.  Microwave, uncovered, on HIGH 5-7 minutes or until cake tester comes out clean.  Carefully remove baker from microwave using oven mitts.
  6. Meanwhile, snip marshmallows in half crosswise using Professional Shears.  Top brownie with marshmallows, chocolate kisses, and remaining 1/2 cup walnuts.  Microwave, covered, on HIGH 1-2 minutes or until marshmallows start to soften.   Remove from microwave.  Let stand, covered, 5 minutes.  Spoon ontop plates and serve with ice cream!

    Mini Breakfast Bites - Mornings made EASY!

    Time for yet another mini-sized creation!  I think that these would be a welcomed addition to a brunch.  I am talking about Breakfast Bites - Mini omelet-like breakfast treats that can be made up with whatever ingredients you prefer.


    Different tastes in your household?  That is the absolute beauty of the Brownie PanYou have 12 individual wells in which you can make different things.  Some of my Breakfast Bites had onions, some did not.  Some had crumbled bacon, some did not.  Love, love, love this pan (and this recipe!)

    I love making these up again on a Sunday night and then refrigerating them in a sealed container.  I have a great breakfast-on-the-go for myself and my family all week-long!  Just pop them in the microwave for 10-15 seconds to reheat and you're on your way with a busy day!

    Ingredients:
    9 eggs (aside from these eggs, all the other ingredients are optional and not all-inclusive.  Have FUN!)

    1/2 cup shredded cheese
    1 cup stuffing cubes
    4 slices bacon, cooked and crumbled
    1/4 red bell pepper
    2 green onions


    Directions:
    1. Preheat oven to 350.
    2. Whisk all ingredients together in a bowl. Pour into each brownie well, filling 3/4 full.
    3. Bake 18 minutes at 350!


    Fastest way to chop chicken EVER!

    Thank you to a fellow Pampered Cheffer for suggesting to me that I use my Salad Choppers for something other than cutting up Romaine lettuce.  Instead, I should be using these to chop up full cooked chicken breasts!  Seriously!


    This is something that I show as much as I can at my shows and blows people away every time.  I cook my chicken breast (in as little as 9 minutes in the Round Covered Baker or Deep Covered Baker!) and then right then and there can slice/shred/chop my chicken breast!  Perfect for cutting quickly into teeny pieces for my girls' teeny hands ... or to shred for chicken fajitas ... or for chicken salad, even!  This is a DEFINITE time saving tool!

    Homemade Potato Chips ... Delicious taste, minus the crud!

    I won't pretend that I don't like potato chips, but I know well enough that I shouldn't bring them into our house because I'd like to eat a bit healthier than that.  My 3-year-old would ask for chips a lot every time we were at the grocery store (hrmm ... has she snuck some at Grandma and Grandpa's house from time to time?)

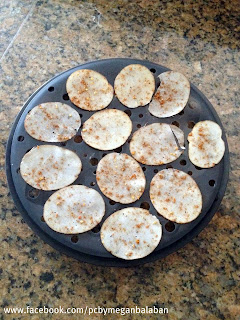
    When Pampered Chef released their Microwave Chip Maker last fall, it was a very welcomed addition into our kitchen!  Now we can have oil-free, non-fried potato chips that contain JUST the potato itself plus whatever seasoning we prefer, if any.  That's it!  And we can have an entire tray in less than 3 minutes - nearly instant gratification!  Given the fact that one restaurant baking potato will provide nearly 75 chips, these are not only delicious and healthy, but also very affordable.  Get creative - the types of chips you can make are endless!  We've tried:
    • Granny Smith Apple Chips
    • Sweet Potato Chips
    • Yuca Chips
    • Jicama Chips
    • Salt and vinegar potato chips
    • Many, many different seasonings on potato chips
    One warning: do NOT season or flavor your chips with anything containing sugar, as the heat from the microwave will cause the sugar to burn and, yes, this could set your little potato slice ablaze! 

    Here are the three steps to creating perfectly tasty potato chips in minutes:

    Step 1:  Using the Pampered Chef Simple Slicer set to "Setting 1" (1/8th of an inch, basically slicing your potatoes paper thin), slice your potato.  Lay the slices out on paper towels.  Using a second paper towel, blot the slices, removing as much water as possible.


    Step 2:  Sprinkle the blotted slices with the seasoning of your choice!  (My personal favorite is Pampered Chef Jamaican Jerk rub)


    Step 3:  Place the chips around the Microwave Chip Maker, making sure they do not overlap.  Place them in the microwave for 2.5 minutes.  (Microwaves do vary.  My personal microwave takes 2.5 minutes but I've seen some that have taken up to 5).


    Step 4: Remove carefully from the microwave and voila!  You have a perfectly done, delicious tasting, crisp potato chip sans oil! 

    Welcome to My Pampered Kitchen Adventures!

    Welcome to my Pampered Kitchen Adventures blog!  I've always loved getting adventurous in the kitchen, but when I started my own business with The Pampered Chef, it took things to a whole new level!  With all sorts of amazing kitchen gadgets at my fingertips that made once-tedious activities simple and fast, I loved my kitchen time even more. 

    Since beginning my business in April 2011, I've built a team of 12 Independent Consultants who are absolutely amazing and changing their own lives in their own ways, thanks to The Pampered Chef.  I promoted to Director this past December and love where my life is headed with this business opportunity.  Please don't hesitate to contact me with any questions around Pampered Chef: if you're curious about the business opportunity (asking questions doesn't commit you, it educates you!), if you want to host a cooking or catalog show (I have no territories and my business is available to you country-wide!) ... please contact me thru comments here or at pc.megan@yahoo.com!

    The purpose of this blog is to share recipes, kitchen adventures, and fun kitchen tips with you all.  Sit back, buckle your tastebuds, and enjoy!